

For this post I want to focus on a super specific topic - hair and make up how to's for the gal who wants to reenact a German WWII civilian. When I started this topic I was not sure how popular or in need it would be but after some socializing Friday afternoon at Rockford's WWII Days I realized that this post may be of lots of use (more than I knew). Why? Because there is a lot out there for Allied impressions with how to get the biggest possible victory rolls and how to get the brightest red lip but not so much for how to get that German look. What is that German look? A look that is natural, simple, and in my opinion down to earth. Actually, if you are super new to WWII reenacting and do a search for 40s hair and make up, rep lips and victory rolls may be all you get leading to a false impression of period looks.
When it comes to adopting a German impression for civilian, how can one tell it apart from an American or French or whatever impression?? Well that is a really good question and I think it comes down to details. . . .Of course for a German civilain you could wear that dirndl style dress and wear your hair in braids (that's totally fine and period! ) but many women in Germany did not wear that all the time as their average choice of attire. Based on my research many women wore clothes that were, well. . .average looking . . .Clothes that were dresses, blouses, and skirts. . .Clothes that on the surface look like they could be worn anywhere in the 40s (even the USA!). Back to the topic at hand though . . . I think it comes to the details and that is why I am continuing with my Dressing the German Civilian post by dipping into to topics that I think require more detail like hair and make up. It seems these are the two most asked about topics either in email or in person while at events. Hair and make up is a detail that can help make a German impression more accurate . . . and possibly more German as well. To start, hair. I am going to start with a little bit about hair with some real examples offered through some photographs and then I will walk you though some examples that are super simple and can be adjusted in many ways to suit your own needs. After we get though that, make up.
Hair for the German Civilian
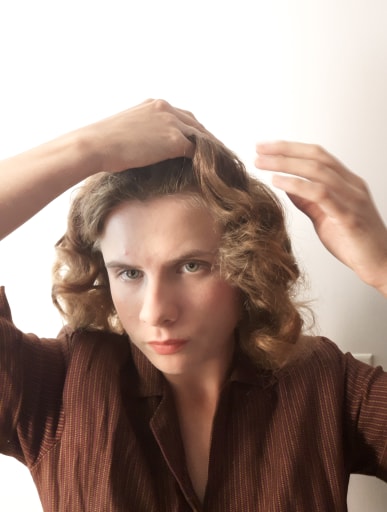
Hair is so hard I think, one of the hardest things to get right. Hair takes a ton of practice and dedication. For the German civilian, simple hair is the best option by far. It can be center or side parted with waves or smooth. curled hair was the most common, in photos it is present over 96% of the time and anything else is really rare and would require lots of good research to be done right. Hair could be done up and confined or down and semi confined. If you choose to NOT curl your hair that's fine but it was worn either braided or confined in a bun.. . .Never left loose.Looking at photos is the best research material because it offers a view of what real German women were doing to their hair. Second best material are magazines. I say second because these are high fashion and may or may not have been actually worn by real women. One thing is for certain though, those magazines may have served as great inspiration for women then ( and can now). For this post, I am looking only at photographs, those in my own personal collection. I love these images, so much fun and so much detail. You can see lots of different looks which can suit plenty of face shapes, hair skill levels, and more.
When you study these, you will see some common characteristics
1) curled hair
2) hair is swept away from the face
3) hair that is worn down appears to be medium to long in length
4) If hair is not curled, it has been rolled into a bun at the back of the head.
5) Any short (or kind of short styles) styles are still curled hair styles.
6) Not a lot of victory rolls (actually almost none!) but lots of waves, pomadores (hair worn high on the front of the head).
7) Hair could be side or center parted.


Now that you have seen some good examples of original German hair styles, let me show you in step by step instruction how to achieve a plain German appropriate hair style. To start, you will need to know how to curl your hair (my curling method choice is pin curling). You can also use hot rollers, hot sticks, rag curls, you name it. There are lots of hair curling options out there and its a matter of finding one that you like and can work with. I will say, that hair that has not been washed will curl better than hair that is washed. I know that sounds icky and if you cannot do that consider using a dry shampoo a day or two before your event or consider using a really good setting lotion to help set the curl after washing your hair. . . .Really all not washing your hair does for curls is that I leaves those natural oils. . . Curls love those natural oils only your own hair and body can provide. You will also need a good brush, bobby pins or small combs, and hair spray. A fine hair net is a great option too. To follow I did one really simple hair style and it is my go to because it is so simple to do and there are lots of variations of it. As a small note, I could not find a lot of documentation for hair spray in German fashion and for here it is only a modern convenience. As far as brands go, A friend recommended Big Sexy Hair. . . .And I do too . . .and a little goes a very long way.
Hair Tutorial # 1
Here is my hair tutorial #1 for a German do. Its a simple one that starts off with pin curls that are brushed out and then coaxed into a do. Once the curls are brushed out, what you do is up to you so this look has lots of variation . . .
 |
| Hair just released from the pin curls |
 |
| Here my hair has just been brushed out. When hair has been curled a good brush out is key. It relaxes the curls and allows them to be created into a period do. |
 |
| On one half, twist it upwards and then bring it to the head and pin in place. I pushed the hair towards the front here a little bit for a poofing at the front of the head. |
 |
| I did the same for the other half of the hair pinning it into place. |
 |
| Next I took my fingers and played with my hair smoothing it out and teasing it upwards. . . . Done! |
 |
| Here I added a fine hair net to secure the hair in the back. below is the side view. |

And to compare against an original here we are. Mine is teased up a little higher than the original but you can see that this look is super period. Pssst. . .Look at the necklace too, not a bad match is it?

Hair Tutorial #2
Here is another one but with a center part. I normally do not sport a center part but plenty of others do so here we go. If you are like me and prefer a side part, this can be done with a side part as well. Like the first hair tutorial, this can be adjusted to suit your needs. To start, I began with a pin curl set that I carefully brushed out but not as much as the first do. I wanted to keep the curls as curly as possible here like in the original.

 |
| For my first step, I parted my hair down the center the best I could. Not pictured here was the brush out which I did like above but not as much as I wanted to keep the curls kind of in tact. |
 |
| The look I wanted had some sculpted waves in the front to frame the face and to get those I played with my hair with my hands. . .Hands and fingers are my best tool. To sculpt my waves I places my pinky under the wave and took my other hand to smooth the hair down. That was how I got my first wave. |
 |
| To get my second wave, I placed my pinky over the wave of the first one to keep the first wave in tact then to shape the second wave. The best way to get waves is to play with ones hair and to practice lots and lots. |
 |
| After sculpting the waves, pin the sides of hair to keep from getting messy. I'm almost done here and as you can see, they are not even. . . That's o.k. Use pins to your advantage if you need them . . |
 |
| Pinning hair into place . . . |
 |
| A Word about Bobby Pins . . . |
O.K. A word about bobby pins . . . For my hair styling, I use two kinds. Tight closed up ones and ones that are wide open that have been used a long time . . .The ones that are tightly closed are new ones and they have a great grip for keeping hair in place. These are kind of my favorites. The other kind, the wide open ones are great for styling hair and keeping a "light" hold where I want to pin back my hair but still want a no pin kind of look . . Its kind of hard to explain but both are great for different kind of hair styling . . .
So here is the final look for some examples of German hair. What do you think?

Hair Tutorial #3
Here is a look for curls that brushed out too much or just did not form into curls but waves instead (it happens). For this one I brushed out the above tutorial and took a huge front section of hair and brought it up and pinned it pushing it up to make a pompadore. What was left was curled to tame the frizz. For curling, brush the hair under (towards the chin or face).
 |
| First a big section of hair from ear to ear. . . The bigger the section you use the bigger the poof of hair. |
 |
| Pin just behind the poofing to keep in place and shoot with hair spray. If the sides do not taper towards the ear then pin as you see fit. . Trial and error here. I had to pin one half but not the other . . .. |
 |
| Optional - tame what is left by carful brushing out. . . |

Tada! You can see my inspiration here and its a nice style that can be dressed up or down with hair flowers.

Hair Tutorial #4
Taking hair tutorial #3, I curled the back into a large roll to achieve this next look which is more tame. . .
 |
| Divide the hair in the back into 2 or 3 sections. I choose to do 2 because that works best for me. . . Roll around the fingers upwards and pin into place on both ends. Once pinned, carefully spread open the roll to widen and full up. |

 |
| As you can see, the end by my ear is little sloppy, that is o.k. I pinned up upwards to close up and to clean up. |
 |
| Make another roll like you did the first one and ta da. All done. If the ends do not meet in the middle take a pin and carefully bring together. |
Here you can see my inspiration. She has a nice poof in the front and it tame or confined looking in the back.

Other Hair Ideas
Sometimes curling your hair is not an option and that's totally fine, all hope is not lost. For this I will tell you some ideas how to do a hair do that does not need to be curled and is a hair do that is worn up wards. This up do is great for any civilian look and any uniformed look as well when hair needs to be worn up off the collar . . .
To start, I will brush my hair over my head which I do by bending my head over. Basically I am brushing out the under side of my hair teasing it up wards. This lets me work up enough volume in my hair to do something with it. My hair is naturally thin and fine to start with. Once its been brushed up wards Ill part my hair and roll it to secure the sides like I did in the tutorial above bringing the most of my hair to the back of my head. Then I will secure my hair into a roll or bun. There are lots of other tutorials available online on simple buns or rolls available in the web and I suggest looking for the simplest ones for a German impression.
If you don't have enough of your own hair to make a bun then you can use a method that has been in place for centuries . . . false hair or hair rats ! Yep, false hair or a hair rat. . .And by rat I don't mean the four legged kind. Making a hair rat is super easy and cheap. All you do is collect your own hair from a hair brush or comb and wad it up into an oval shape . Where you need volume add the rat by pinning it into place and covering it with your own hair. Would you like a tutorial about hair rats? Just ask . . .
False hair or wigs are another option to consider. A false hair piece can be added to your normal do to fill in thin hair or if you have a short hair cut, also false hair piece can give the illusion of a full and stylish bun (simply pinned into place and no one will be the wiser). A larger investment is a is a wig. Wigs can be styled into almost any do and just worn like a hat and if done right, looks great. Wigs can be hot and uncomfortable for those muggy days but I think its still worth thinking about as a hair solution.
Make Up for the German Civilian
 |
| My products . . . |
For this post I want to discuss how to do make up for a German impression because I know plenty of women who refuse to go out in the world with out something on their face. If you choose to wear make up with your German impression, because I am sure there are a few of you out there who want to, let me show you how to do it right at least. To start, keep it light and keep it natural. Choose at most a foundation that matches the skin, a light rouge/ blush and maybe consider no mascara (if you choose to wear it keep it light and don't cake it on like no tomorrow) and little to no eye shadow. For the love of accuracy please no blue eye shadow. I'm not sure how blue came to be a color of historical eye shadow but don't wear it for a German WWII impression or any historical one. Keep the lip stick at home or else pick a neutral or light pink. Below I show you an example on how I did mine. I will admit that when I go with my impression I go make up less.
My products are as follows: Apricot Cream Rouge and Vanilla Brightening Powder. Both of these are from Besame Cosmetics. If you are not familiar with Besame, they have recreated vintage make up matching colors beautifully to what would have been available then. These are American colors that have been reproduced as far as I know but I think for a German or other impression they would work fine. Have another product line you like to use? Feel free to use it just as long as your end result is a natural looking one. There was a desire for tan skin in Germany. It meant one was outside, healthy, active, etc so if you have a bronzer feel free to make use of it as well or may be get a bit of tan before the event. . .Both are period believe it or not.

I will say that one advantage to a German impression is the no make up part. Think about it. It is one less thing you need to pack, worry about, or think about. Why? Because its not there! There will be no need to worry if your lipstick is faded or not and no worries about a shiny face either. . .Just a thought.
So was this helpful for you? Did you find this post about German hair and make up of any use for your impression? If so let me know and if there is anything thing else that I left out or you would like more on say so!
Well, what do you think? Was this helpful or really? Did I miss anything or would you like more info about something? Comment below or send me an email.
Comments
Post a Comment